Table of Contents
Coffee Blog: 2022-05-15
In 2021 I decided to take my love for coffee a stage further. For quite a few years I'd been making my own blends from pre-roasted beans, and that had met with varying amounts of success (as you can probably imagine). That is until I started getting serious with it and making charts with the various flavours and notes I perceived and what the strengths were of these and whether they were desirable or not. For example, I might taste a berry flavour, and depending upon how strong that flavour was I'd give it a numerical value. If it was undesirable, it was a negative value.
Using these charts I could blend different beans (they might be roasted lighter or darker, or be from different regions) and in the right ratios, the negative flavours could be minimised and the desirable flavours enhanced. With a bit of skill and experience, the right flavours could be balanced - you do have the numbers after all. It's a simple but very effective system.
It stands to reason then, that one day I'd want to start roasting my own beans.
Flat Roaster
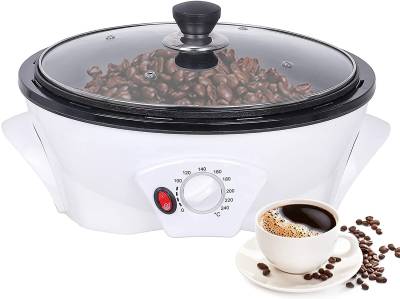
The flat roaster I first purchased was reasonably cheap and looked like it could do the job well. The beans are poured onto a hot-plate, and a pair of arms swing around stirring the beans to turn them over. I found the first major problem of roasting with this machine. For decades I was a heavy smoker. I've been free of the weed for several years now, but all that abuse left me with COPD.
Roasting beans occurs in three major phases, the first of which is to dry the beans out. Although they have been dried, they still contain water. If you remember your physics, the water absorbs all the heat and turns to steam, carrying all that lovely energy away with it, stopping the beans from getting hotter than 100C. Roasting is just another cooking process, and the very definition of cooking is to raise something to a certain temperature. Coffee beans need to get hotter than 100C, so you have to wait until all the water has evaporated.
The steam contains micro-droplets of oils. When that gets in your lungs it reduces your capacity to breathe. Probably not a major issue for healthy, athletic people, but for someone with COPD it's serious. I learnt my lesson the first time, which left me struggling to breathe for hours afterwards. On an additional note, if it's coating your lungs it's also coating every surface it comes into contact with, and you don't want that building up over time in your kitchen. Ventilate well, have any cooker hoods switched on to maximum, and wear a mask.
I was having some very good results with the flat roaster, although there was little control over the temperature of the plate, because the control wasn't digital and the dial was way too small to distinguish between 225C and 235C. Also, it required a minimum load, else the arms wouldn't stir the beans, they would just push them around. Somewhere between 200g and 250g was the minimum. Think about this, if I wanted to blend, I'd have to do 2 or 3 loads, ending up with somewhere between 500g and 750g of beans. That's a lot for just one man to drink in a week, or even a month.
Cooling
 Once the beans are cooked, you need to cool them down. If you don't, they just keep cooking until their temperature drops below reaction temperature. This leaves you with two choices: either get them out of the roaster early so they are perfectly roasted by the time they finish cooking, or leave them in the roaster until they reach perfection and then rapidly cool them down.
Using the first option is fraught with problems. Inner parts of the bean will continue to cook, even as the outer parts are slowly cooling. This means that some of the desirable acids may end up getting destroyed.
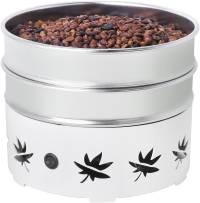
I purchased a coffee bean cooler, not expecting much from it, but it'll happily cool 250g of beans to room temperature in under 90 seconds. That means I can leave the beans in the roaster until they are the required colour and then pour them into the cooler. Additionally, it helps separate the chaff. The chaff is the paper-like substance (hence it is sometimes called paper) that separates from the surface of the bean during the roasting phases. There is some debate about whether separating chaff is important. One youtuber made a tea out of the chaff and found that you needed so much of it to be able to taste it that it was like putting a spoonful of sugar in 1,000 cups of water - if you can taste that then you definitely need to separate the chaff.
That said, the chaff can make a mess of your grinder - which should definitely be a burr grinder, not the blade type. Beans should be crushed, not chopped. If you think it makes no difference then ask any cook about the difference between chopping or crushing garlic.
I needed to resolve the issue of being able to roast coffee in smaller amounts. Enter the Gene Café.
Drum Roaster
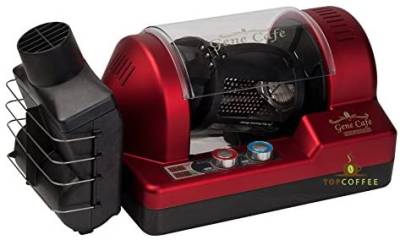
This machine takes a maximum load of 250g, as opposed to the 250g minimum load of the flat roaster, meaning I can roast smaller quantities with ease. The drum is off-axis, so as it rotates it also tips with one end down and ending with the other end down. This ensures the beans don't get stuck in part of the drum, and also helps to ensure they are continually mixing amongst each other. Partitions inside the drum force the beans to roll and jumble rather than just sliding as the drum rotates.
Another major feature of this machine is that it has an exhaust. You can see this at the top of the black box-like structure on the left. That structure collects huge amounts of chaff, another excellent feature. I attached a pipe reducer to the exhaust which expanded the bore from 80mm (the size of the exhaust) to 100mm, and then attached a 100m expandable metal ducting tube which carries all the nasty steam, oils and aromas out of the kitchen. By the way, if you think roasting coffee smells of coffee, you're mistaken. It smells of cooking hay, or possibly peanuts.
This machine is by no means a perfect machine. Although it has digital temperature control, it measures the temperature of the exhaust. An excellent machine will also measure the temperature of the beans. Comparison of these two measurements tells you what is going on inside the roasting chamber much more than eyeballing the colour of the beans, and allows you exquisite control over the roasting process. As it only measures the temperature of the exhaust, you still have to eyeball and use the exhaust temperature as a guide.
All that said, it's not cheap, but a lot cheaper than one of those machines that can read both temperatures. I have neither the space nor the money for one of those things, and they're best setup in a shed, garage or basement - none of which I have. Still, in nice weather I can take the machine outside and avoid any of the nasty smells filling my home.
Roasting Temperatures
As they cook, coffee beans - which are not beans by the way, they're pips - should continually rise in temperature. If their temperature drops, they stop cooking (not entirely but further development effectively ceases), if the temperature stalls, further development ceases and volatiles that have been created get destroyed. So it seems odd then, that partway through the roast, the person operating the roasting machine drops the temperature. Although the machine is generating less heat, the beans - internally - are still heating up.
The first phase of roasting is drying the beans, during which time they turns from green to yellow - just like drying grass. However long this takes, needs to be about 50% of the total duration of the roast. Stretching this out is a good thing, because the next requires sufficient time to work. However, if the drying phase becomes too long it'll have an adverse effect and even shortening the next phase won't cure that.
The second phase is the browning phase, where - just as the name suggests - the beans turn from yellow to brown. During this phase, the caramelisation of sugars occurs, and the development of acids (acids are where the interesting flavours are). This phase should occupy 30% of the total roasting. If the timing is right, the end of the browning phase is signalled by 'first crack', where steam inside the bean causes separation of the papery chaff from the bean. As this phase begins, the temperature is often dropped to allow time for this phase to create as many flavours through Maillard reactions as possible.
The third phase is known as the development phase, where all those lovely flavours created by Maillard reactions in the browning phase are further developed. Some people stop early in this phase, for a fruity, yet tea-like coffee, other people go to the end of the phase, second crack. Second crack occurs when CO2 is released and the bean expands, causing yet more damage to the attachment the chaff has to the bean. These cracks are quite audible, and sound not too dissimilar to popcorn.
It is possible to keep roasting, but after second crack the acids that provide many of the interesting flavours are destroyed and a cleaner, roasted coffee flavours ensues - great if that' what you want, even better if you're aiming for a bitter espresso (FYI Italians generally roast their espresso light than this).
There are more phases, these are just the broadest and most significant.
Today's Roast
 I've had the Gene Café a few weeks now, and I've managed to do some awful roasts that were undrinkable, but I've had a few successes too. Today was a case in point.
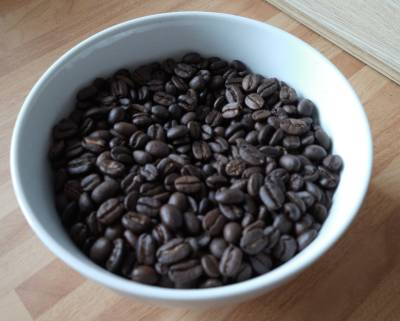
You can see the results in the image, although (obviously) you can't taste it. Here's a thing: coffee should be left a few days after roasting before drinking. CO2 needs to be outgassed, and the beans will vent quite a lot of that stuff over the first three days. It will mature until it reaches its peak ten days after roasting. That's the official line, and if you store your coffee (after allowing it to vent for three days) in a container that has a CO2 release valve, that's probably true.
I have a negative pressure tin which I have found allows the coffee to continue maturing with almost no interaction with the CO2 it gives off (a tin with a release valve is a positive pressure tin). CO2 readily turns into carbon-monoxide, and the chemicals (volatile flavours) in the bean strip an atom off the CO2 during oxidisation. A negative pressure tin doesn't prevent this, but if the volume of the vacuum is large enough, it greatly reduces the number of reactions taking place. I can store a kilo of coffee beans in my NPT, but only have - at most - 250g in there. A nice large vacuum.
Back to today's roast. The beans are actually lighter than they appear in the image, even after adjusting light balance, so they're not a dark roast at all. I stopped roasting at second crack, which was slightly longer than I'd intended. After the beans were cooled, I used a French press to taste. I could have used a mocha pot, which generally gives better results, but freshly roasted beans give off a lot of CO2 and that means when you pour hot water over them they fizz. I kid you not. In the French press, a massive foam cap forms, and most of the coffee grinds are entrapped in it, so it has to be stirred with a spoon to get them all back in the water.
Despite the beans needing another ten days to mature, making a mug straight away will often reveal the success of the roast. In this case, it was a very enjoyable coffee full of rich, chocolaty flavours (It was a Columbian Excelso Huila) with plenty of interesting fruity flavours. It'll be a lot better in a week.
I started the roasting with the beans in a cold roaster because I just wanted to see what happened. It certainly extended the drying phase out to 9 minutes, leaving the browning phase to last for 6:30 and the development to just around 3:30. Other roasters will probably be horrified at starting cold, but it was an experiment, so there.

